
 RoutrGet Routr
Start with the outside defender
Cover 2 puts two defenders deep, with underneath coverage protecting the shorter throws. You can attack the space between those levels, but your quarterback still has to read the defender near the catch point. A route name alone does not tell you whether the window is open.
Begin by finding the corner over your short outside receiver. Watch whether that defender stays low, backs toward the deeper route or widens to the flat. Keep the deep help in view before throwing over the corner. You want a clean lane between defenders, not a ball dropped into a crowded gap.
Use a short and a deep target together. When the corner takes one, the quarterback checks the other. Keep enough distance between their routes that one defender cannot stand between both receivers and reach either pass.
Smash Return gives you the first high-and-low read
Call Smash Return with 6 yards to the goal line. Z runs a hitch to 5 yards and comes back to 4. Y climbs to 5 and breaks toward the corner at 10. Your quarterback looks to Y if the outside defender sits on Z, then takes Z if the defender drops.
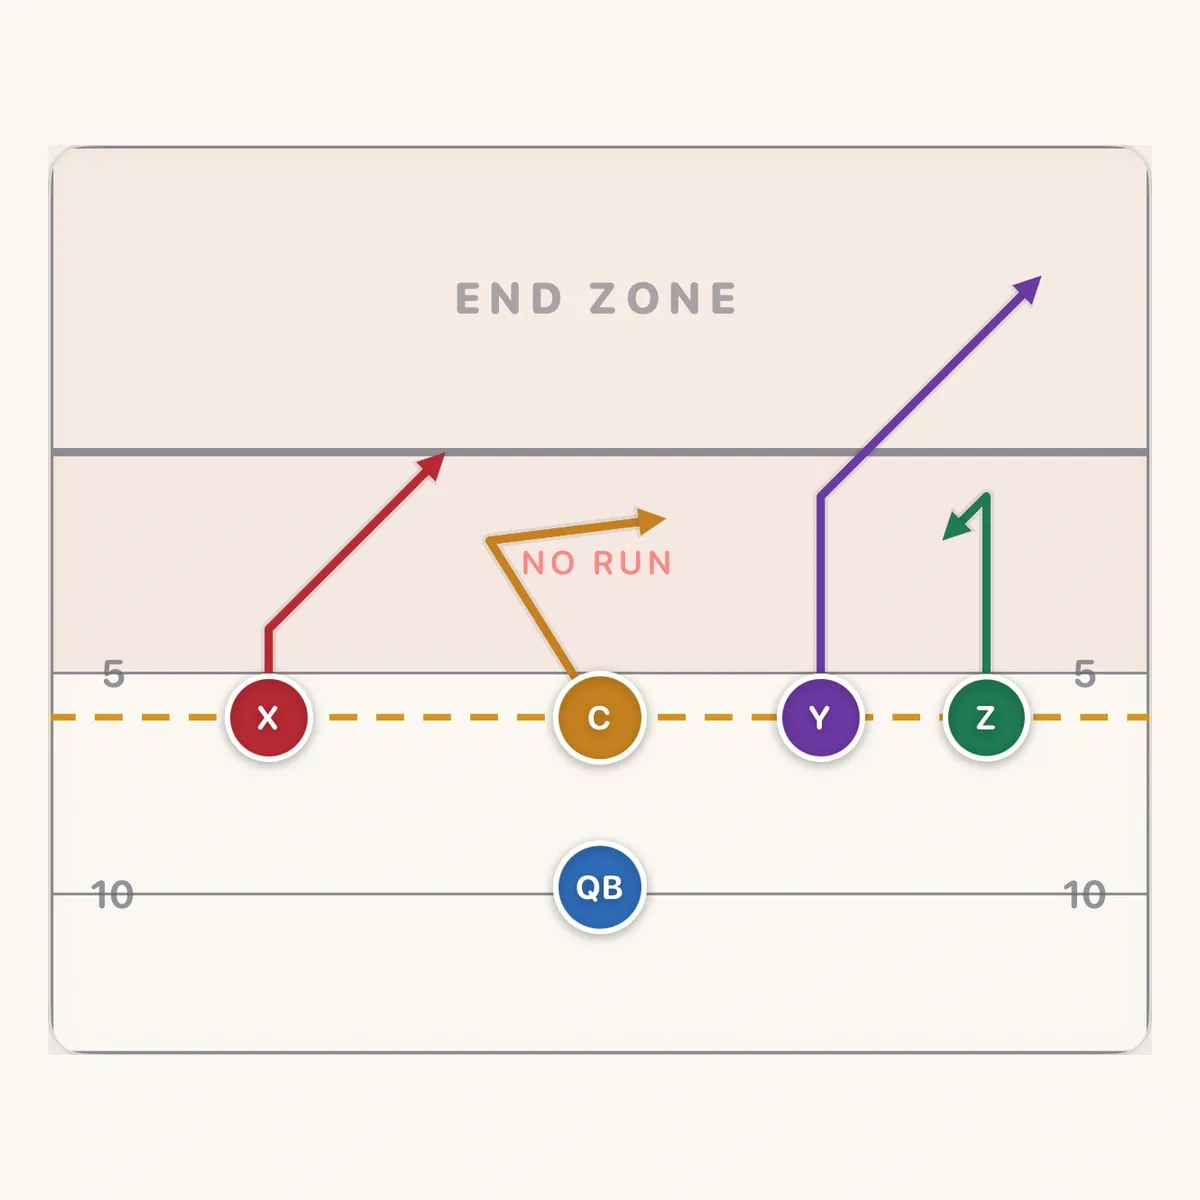
Coach Z to turn promptly and face the ball. Y keeps moving outside and deeper toward the back pylon. A hitch that drifts downfield or a corner that stays too shallow brings the receivers together and lets the defense cover both.
C turns back across the middle near 4.5 yards as the third read. X slants inside from 2 toward 6 and gives you an early hot throw against pressure. Practise those throws alongside the outside pair so the quarterback has somewhere to go when both are covered.
Flood Switch adds a third outside level
Use Flood Switch from trips right with 15 yards to the goal line. Y releases outside and climbs toward 18 yards. Z goes underneath, climbs to 10 and breaks out. X widens into the flat near 2.5. Those three levels stretch the same side vertically.
The quarterback rolls right behind the line to shorten the throws. Read Y deep if the corner squats, then Z on the out, X in the flat and C on the hitch. Set your feet when possible so the ball arrives on the receiver’s route instead of pulling the catch toward the sideline.
Walk Y and Z through the switch release first. Both receivers keep running and avoid contact. They must not stop in a defender’s path to free the other player. The route exchange should leave Y high, Z in the middle and X low.
If the defense puts a player on each outside level, take the center hitch when it opens. You can also return to a middle concept on the next snap. Avoid making repeated outside throws into a defender who is already waiting on them.
Dagger works through the middle
Call Dagger when the rush gives your quarterback time. Y runs the seam toward 20 yards and X breaks across on the dig at 14. The seam stretches the deep coverage above the dig. Your quarterback checks Y if nobody carries the seam, then looks to X underneath.
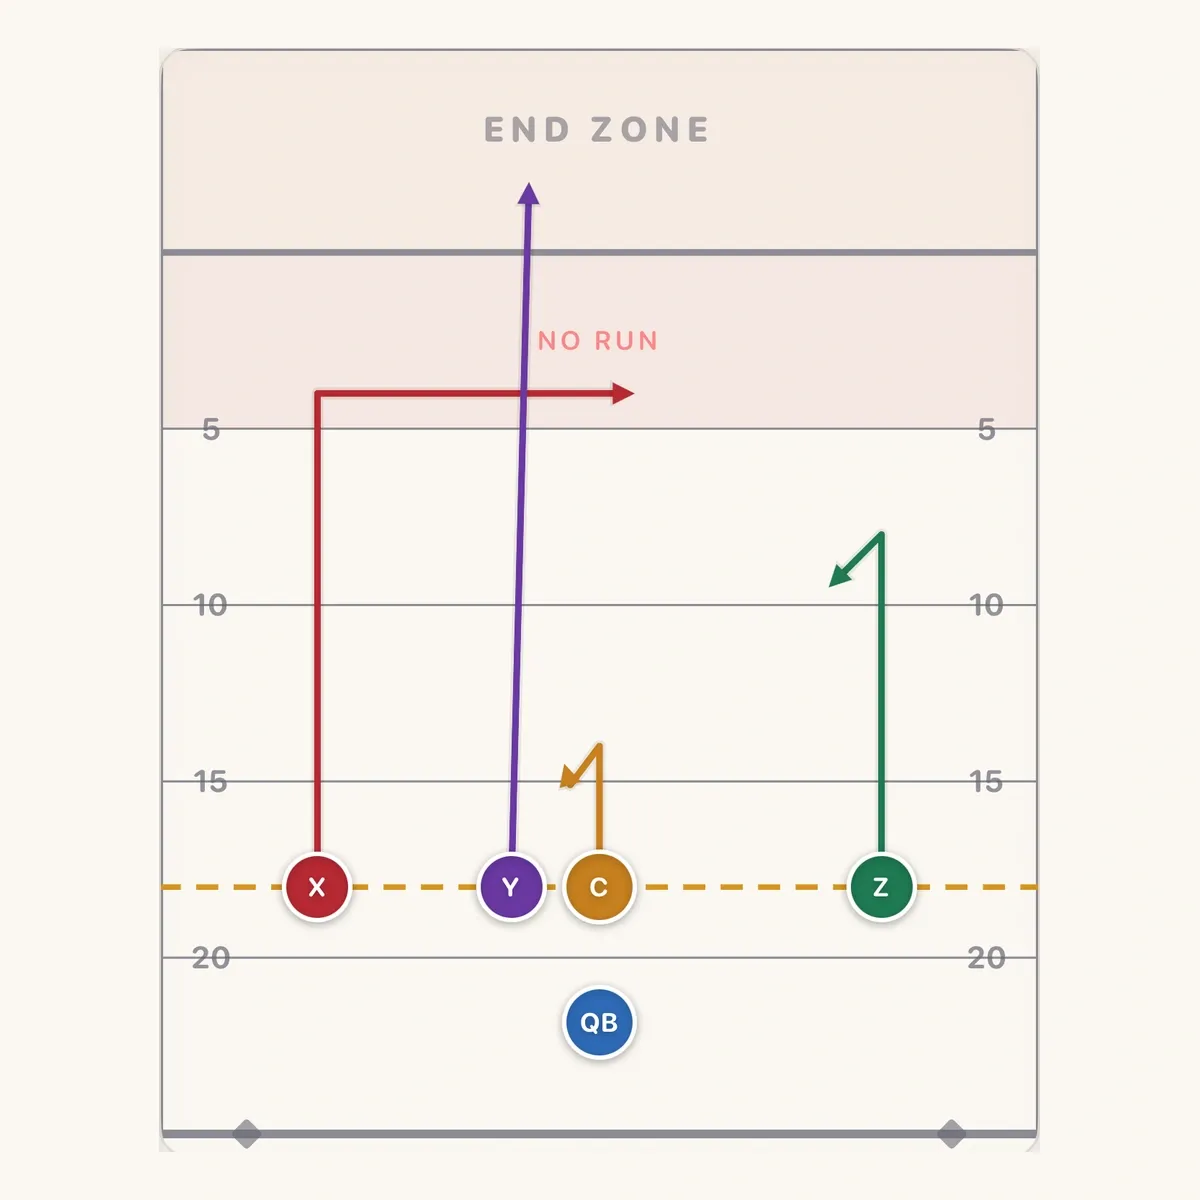
Do not stare at X through the whole release. Watch the defenders carrying Y and dropping under the dig. If a defender remains in X’s window, continue to Z’s curl or C’s short hitch. Keep your feet ready for the checkdown after looking deep.
Use this play with 18 yards to the goal line and enough room for the deeper patterns. X needs time to reach the break. Against a fast rush, choose the quicker Smash Return decision or take an early underneath throw instead of waiting for the dig.
Practise one decision at a time
Start with Smash Return and one outside defender. Have the defender sit on the hitch for one repetition, then drop toward the corner on the next. Your quarterback names the open level and throws. Add the deep defender once that choice is clear.
Next, run Flood Switch with three marked route depths. Let the defense change which level it covers. The quarterback moves down the progression while the receivers maintain their spacing. Finish with Dagger against a soft rush, then speed the rush up so the quarterback practises finding the short answer.
Keep the routes and boundaries clear
Use the sideline and goal line in every drill. The deeper outside receiver needs room to complete the catch in bounds. When you move into a no-run zone, keep the call as a pass. Your quarterback cannot run the ball past the line of scrimmage.
After each series, ask which defender changed the throw. If your quarterback can identify that player, keep the same decision and vary the coverage around it. If the answer is unclear, return to the two-receiver drill. Use the route guide to sharpen the individual breaks before adding more calls.